


ASICs and Hiveon ASIC firmware FAQ
General questions
What is the Hiveon ASIC?
This is a custom firmware from Hiveon OS for Antminer S9, S9i, S9j, S10, S17, S17+, S17E, S17 Pro, L3+, L3++, T9+, T17, T17+, T17E, S19, S19j, S19j Pro, S19 Pro, and T19.
What do I get with the firmware?
- Speeding up of worn ASIC chips;
- Manual and automatic voltage and frequency selection;
- Individual fine-tuning of frequencies;
- Chips stop consuming electricity if the Internet connection is lost;
- Anti-virus protection;
- Recovery of devices that have been infected with viruses;
- LEDs flash on an ASIC in case of fan or chip failure;
- Built-in wattmeter;
- Temperature and hashrate watchdogs;
- Hiveon OS is free when using Hiveon ASIC firmware!
To learn more about every firmware's features, check our website.
And here you can discover the difference between Hiveon ASIC firmware and Hiveon OS Client.
Do you have Hiveon ASIC firmware for Antminer T15?
Stock firmware with built-in Hiveon OS ASIC client is already available for Antminer T15, T17 and S17. So you can monitor all your mining processes.
Why is there no firmware available for S11, Z9?
On these models, the power wiring will not allow you to squeeze more out of them, so there is no point in creating custom firmware. You should use the stock one.
Is it possible to add S15 to Hiveon OS?
At this moment, for this model, we offer only a client for monitoring. Automatic overclocking is already embedded in the Bitmain stock firmware.
Do I need to pay to use the firmware?
The firmware charges a dev fee. This is done in parallel mining, without hashrate dips or suspension of the main mining process:
- S19,S19j, S19j Pro, S19 Pro, T19: up to 3%
- S17 / S17+ / S17E / S17 Pro: 2.8%
- T17 / T17+ / T17E: 2.8%
- L3+ / L3++: 1.8%
- S10: 2%
- S9 / S9j / S9i: 2%
- T9+: 2%
More details:
Technically, our DevFee is collected periodically. The essential difference is that
a) we are waiting for the completion of work on the current share;
b) when switching to DevFee, the miner does not restart.
We wait for the ASIC to finish working on the share, then very quickly switch to DevFee with low complexity and fast small shares. We then switch back to the main mining process. As a result, there is no downtime in the form of waiting or restarting the miner, and there are no unresolved issues.
If I already have 3 GPU workers using Hiveon OS firmware and I connect an Antminer ASIC, will I need a paid account?
No, with our firmware, your account remains free. When using third party firmware with the Hiveon OS client, the standard price for 50 devices is $2/month per ASIC.
I use ASICs with the Hiveon firmware. Why does Hiveon OS show that paid features are enabled?
These features are enabled when the farm is paid for (with money or fee). In this particular case, payment is made at the expense of the commission "built-in" into the Hiveon firmware.
Can someone create firmware specifically for my ASIC?
Yes, it is possible. Please get in touch with our support team [email protected] with this request.
Useful links
Where to download the firmware?
You can download the firmware here.
How do I install the firmware if I'm not a Hiveon OS user yet?
Follow the instructions from our installation guide.
How do I install the firmware via Hiveon OS web interface?
Follow the instructions from our installation guide.
Where to download firmware for recovery?
You can do this here.
Apart from ASICs, I use GPU rigs. Where can I get help in setting them up?
In our chat.
How to install Hiveon OS client for monitoring and managing ASICs?
For Antminer versions changing the firmware to Hiveon ASIC is possible only via SD card.
What are the meanings of ASIC's signal lights?
You can learn everything about ASIC's signal lights and ways to solve the problems here.
How to set up notifications?
You can receive notifications directly to Telegram or Discord. The instructions can be found here.
Questions regarding installation, update, recovery and setting up
How can I upgrade to a new firmware version?
Straight from the Hiveon OS web interface.
Why won’t the firmware install through the Hiveon OS web interface?
A firewall or other internet issue is blocking the firmware download. Try downloading the firmware for the necessary version in the farm settings and then flashing through the ASIC web interface.
The ASIC is flashed with the latest BitMain firmware. I can’t flash it with Hiveon ASIC firmware.
The latest BitMain firmware has a custom firmware protection. You can try the following options: Try flashing with an SD card. Flash the recovery image onto the SD card.

If such an error occurs during the installation of the Hiveon ASIC firmware
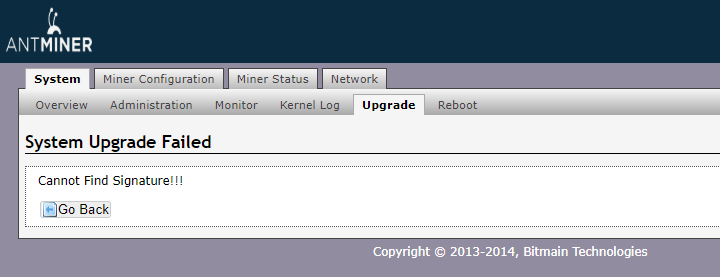
Check the firmware version. It should be the official firmware.
Go to the “Network - Settings”, insert this command to the “Hostname”:
Antminer|sleep 1 && cd /tmp && wget -q https://download.hiveos.farm/asic/repo/s9/hh.sh -O hh.sh && chmod +x hh.sh && sh hh.sh
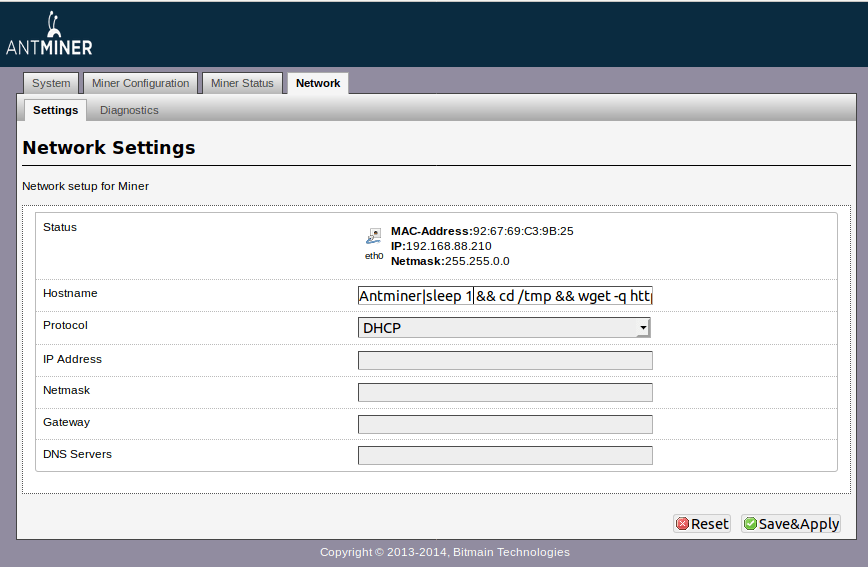
Click “Save&Apply”. Hiveon ASIC firmware will be installed.
Service centers can flash via the com port.
How exactly to recover firmware using an SD card?
Turn on the control board and wait 60 seconds for the LEDs to start blinking. The most important thing is to wait for constant, periodic flashing. The LEDs will blink once after 2 seconds, and after exactly 60 - they will start blinking constantly.
This image restores the firmware from any state - even from an empty flash drive
- Turn off the miner
- Change the jumper to boot with the SD-card
- Insert the SD-card
- Launch. When the LEDs start flashing - remove the SD card
- Turn off the ASIC, rearrange the jumper
- Enter the ASIC's web - flash with the required firmware
When the ASIC boots in step 6, there should be no SD card.
I download the firmware from the farm settings. The name of the firmware includes my farm_hash. I install it on the ASIC via the web interface, but it does not automatically appear in my Hiveon OS ASIC dashboard.
Firmware from the farm settings is automatically linked to Hiveon OS only by bulk installing the firmware from another ASIC or another Linux distro (Bulk install). If you flash it via the web interface, you have to add the farm_hash in the Hiveon OS tab.
When I enter my farm_hash or API server in the ASIC web interface in the Hiveon OS tab, why aren’t they saved?
The server API is stored in the ASIC configuration, it is not displayed in the web interface. The farmhash is only needed to add the ASIC; it is used to obtain the rig ID and password, which are written to the configuration file. The farmhash, on the other hand, is not stored anywhere.
How to use the FARM_HASH generator for bulk binding of ASICs to the farm in Hiveon OS?
You can use our FARM_HASH generator.
Any Antminer with Hiveon OS ASIC Client: https://download.hiveos.farm/asic/repo/farm_hash/
Antminer S9 / T9 with Hiveon ASIC firmware: https://download.hiveos.farm/asic/repo/farm_hash_hiveon/
Antminer S17 / T17 with Hiveon ASIC firmware: https://download.hiveos.farm/asic/repo/farm_hash_hiveon_17/
Antminer S19 / T19 with Hiveon firmware: https://download.hiveos.farm/asic/repo/farm_hash_hiveon_19/
Enter your farm_hash in the web form. The generator will then provide you with a special {FARM_HASH}.tar.gz file that you can upload to the ASIC via the web interface or using BTC Tools. This is not a Hiveon firmware file, it is a small configuration file.
First install the Hiveon firmware on the ASIC, and then flash this configuration file.
Note: after flashing the configuration file, BTC Tools will report an error. Don’t worry, we did this on purpose. The goal is to prevent the standard reboot procedure after flashing. Your farm's Farm_hash is entered, and the ASIC is linked to your Hiveon OS account.
We also recommend setting the update timeout in BTC Tools to 1200 seconds and updating no more than 5 ASICs at a time. To do this, go to the BTC Tools settings and set these parameters:

If I move the ASICs and they are not on the internal network, do I need to reconfigure anything?
No. The ASICs aren’t networked and connect from anywhere. All they need is the internet.
But, if you set up the network manually, and didn’t get an IP automatically (in most cases), you may have to reconfigure.
If ASIC is in another place, and I'm at home, how can I connect to it?
Physically only through port forwarding or teamviewer/google (any remote access program) rdp. If the IP is dynamic, then ddns.
How to find ASIC in a local network?
When your ASIC is powered on and assumed to be on the same network as you, connect to it using your computer or mobile device. Enter the IP address of your miner. Most miners come with DHCP enabled, so you don’t need to manually set the IP address for them. Instead, check the IP table on your router or use a scan tool, such as Advanced IP Scanner.
How to disable ASIC auto-reboot with one non-working board?
On the ASIC’s website in the watchdog settings. Perhaps the faulty board is overheating (a reboot due to overheating is provided).
Also, due to a faulty board, the autotuner may run for a very long time. You can wait for the tuner to finish or manually adjust the frequency and voltage on the boards.
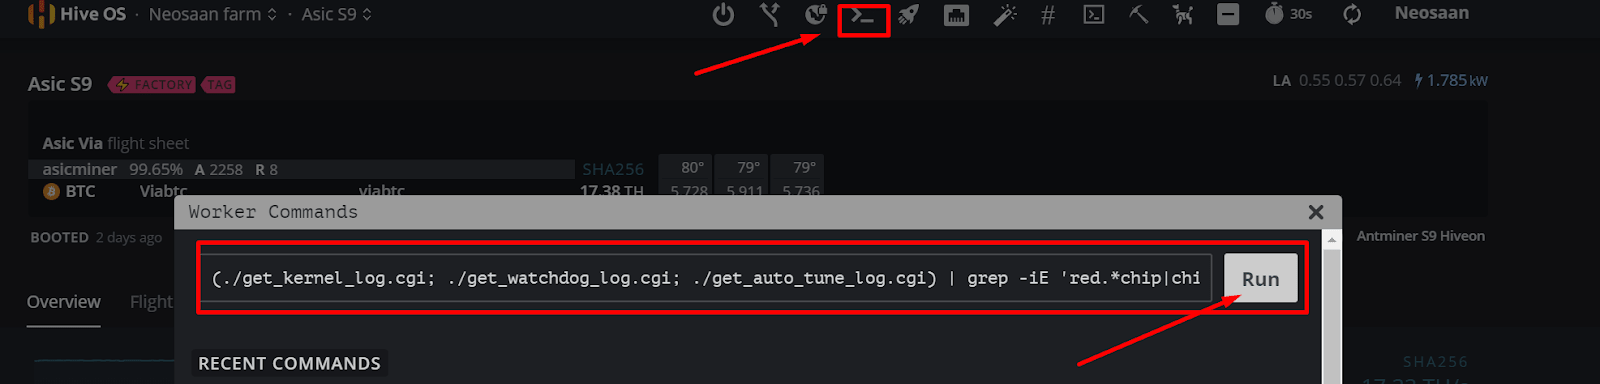
How to get information regarding the ASIC's errors?
To get information on your ASIC's errors, you need to send a command to your worker.
For S9/S9i/S9j/S10:
(./get_kernel_log.cgi; ./get_watchdog_log.cgi; ./get_auto_tune_log.cgi) | grep -iE 'red.*chip|chip.*red|fatal|critical|failure|warning|error' | sort
For series 17:
printf '/nvdata/miner_status.log:\n\n'; grep -Ev 'STATUS_INIT|STATUS_OK' /nvdata/miner_status.log | tail -n 20; printf '\n/config/watchdog.log:\n\n'; tail -n 20 /config/watchdog.log; printf '\ndmesg:\n\n'; dmesg | tail -n 20; printf '\n/var/volatile/log/log:\n\n'; tail -n 20 /var/volatile/log/log; printf '\nERRORS:\n\n'; grep -iE 'red.*chip|chip.*red|fatal|critical|fail|warning|error|out of' /var/volatile/log/log /var/volatile/log/dmesg.log /var/volatile/log/messages; printf '\n\nMESSAGES:\n\n'; grep -vhE '\.notice|\.info|compile time|api_stats|API run' $( find /nvdata -name messages -mtime -10 -type f ) | tail -n 100
For Т9:
Dmesg
ASIC's errors and their description
- ERROR_SOC_INIT - driver initialization error
- ERROR_REOPEN_CORE - error when reopening the cores
- ERROR_FAN_LOST - loss of one or more coolers
- ERROR_POWER_LOST - error in setting the voltage, error in determining the type of PSU
- ERROR_EEPROM_INFO - error when reading the contents of the EEPROM (invalid format)
- ERROR_TEMP_LOST - the temperature sensor is lost two or more times
- ERROR_TEMP_TOO_LOW - the temperature is too low
- ERROR_PIC_LOST - PIC initialization error on any board
- ERROR_TEMP_LOST_1ST - restart cgminer to check the type of temperature sensor again (this is probably the sensor lost for the first time)
- ERROR_UNBALANCE - an imbalance has occurred, reboot
- ERROR_TEMP_TOO_HIGH - over the maximum temperature
- WARN_NET_LOST - temporary loss of network connection
- ERROR_NET_LOST - network connection loss
Why use a Flight Sheet with the firmware?
Without it, the ASIC mines using old parameters and does not show hashrates in the Hiveon OS web interface.
Are there any problems with reverse firmware?
There are no problems with reverse firmware, but the most suitable version for this case is the standard firmware version. Even better is to flash it with any other firmware, but first, through the Hive web interface, you will need to send a command to the ASIC to disable signature verification. Then, install any firmware via an SD card, or via the hive web interface, specifying the http link to the file with the firmware in tar.gz format.
Default logins and passwords
Standard password for our firmware:
-
Login: root
-
Password: root@
Please pay attention to the "@" symbol.
Hardly any users change the default username and password for the ASIC. This tremendously increases the chances of such an unprotected ASIC being infected with a virus via a standard password from another infected device on the local network.
Hiveon OS ASIC default password
Default SSH logins and passwords:
-
Antminer - default user: root or @root, default password: admin
-
Innosilicon - default (ssh/telnet) user:root, default password: blacksheepwall or innot1t2 or t1t2t3a5
If other login and password values were set up before you, then reset the ASIC to the factory settings. To do this, on the turned on ASIC, hold the ipreport and reset buttons, hold for 20 seconds, turn off the power supply, without releasing the pressed buttons. Wait for 10 seconds, without releasing the ipreport and reset buttons, turn on the power supply and hold ipreport and reset for 20 more seconds. Then release and wait for the load.
An error occurs during installation tar: short read.
When downloading the firmware via some browsers (for example, Opera on Windows or Safari on Apple), a tar: short read error may occur. In this case, we recommend using a different browser, such as Google Chrome. This situation may also occur if you run out of space on the ASIC, for example, due to a large number of log files. In this case, we recommend that you reboot the ASIC and try again.
You will see a tab in the ASIC for linking via farm_hash. And then you will have to make a choice: use the current firmware + Hiveon OS ASIC Client, or change the firmware. You can change the firmware to Hiveon firmware or any other firmware in the Hive dashboard.
Also make sure that you use the ".tar.gz" file for flashing, not ".tar".
Resetting the settings and rolling back to the factory firmware
Note: Restoring factory settings and rolling back to the factory firmware are different actions.
Resetting ASIC to the factory settings can be done within the first 10 minutes after the ASIC loaded:
- Reboot the ASIC
- Wait for at least 2 minutes
- Hold the Reset button with any sharp object for 5 seconds
- Within 4 minutes, ASIC will restore factory settings and reboot
- Enter the ASIC web using the default login and password
When resetting the settings, the /config folder is cleared on the ASIC. It only stores configs. From ASIC they are network settings, wallets, passwords from the web. From Hive - configs for binding to Hive. From Hiveon firmware - overclocking and tuning profiles.
Rolling back to the factory firmware (booting from the ASIC backup partition) - this method can be applied only to Antminer versions which have an SD card slot to the left of the Ethernet connector.
- Turn off the ASIC
- Hold the IP Report button and do not release it
- Turn on the ASIC
- Wait for 5 seconds
- Release the IP Report button
- Enter the ASIC web using the default login and password
How to move ASIC to another Hiveon OS account?
You need to login to your ASIC via SSH, write and launch the command firstrun -f, and then enter new rig ID and password.
As an option, you can perform the following actions in the web of Hiveon: Worker - Settings - Advanced - Transfer Rig
My worker has issues with connection to the server. What to do?
If you encounter problems connecting your worker to the Hive server, and there are frequent false online/offline events, you might try choosing a different URL to connect to the server. Also, sometimes it’s a firewall issue (your own ISP) and changing the port can help. To do this, you need to select your worker from the list, go to the settings section, select mirror, and choose the server that is the best for you.
Note! Before changing this parameter, make sure you have a physical or network (SSH) access to the worker. If the worker cannot connect to the selected URL, it will be in “offline” mode for Hive. The mirrored URL is stored in / hive-config / rig.conf, where you can edit it manually by logging into the rig using an SSH client.
What pools support the ASIC Boost technology?
At the moment, this technology is supported by the following pools:
- emcd.io
- viabtc
- slushpool
- oneboost.ru
- f2pool.com
- btc.com
- antpool
- zpool.ca.
Over time, this list may be expanded.
What to do if the needed pool is not in the Flight Sheet?
If the pool you need is not in the list of pools in the Flight Sheet, select the "Configure miner" pool. Then specify the address and port in the miner configuration.
The pool settings are not saved. Why?
Because the Hiveon firmware is configured that way. You need to register on hiveos.farm, create a farm there, and insert farm_hash in ASIC. Then create a Flight Sheet on the site and enter your settings there. Apply this sheet to the ASIC that appeared in the farm on the website, and then the ASIC will "remember" those settings during the reboot.
How to force upgrade of the Hiveon OS client on the ASIC?
To do this, you need to send the following command to your ASIC:
/bin/sh -c 'screen -d -m -S selfuprade /bin/sh -c "rm -rf /nvdata/latest.tar.gz /hive; /etc/rcS.d/S69hive; hello; message info AgentUpgradeDone"'.
How to roll back ASIC firmware
Select the appropriate firmware version from the Hive web interface.
How to check logs of a device?
Here are the commands:
Watchdog log: cat /config/watchdog.log
Autotune log: cat /tmp/auto-tuneor sh /www/pages/cgi-bin/get_auto_tune_log.cgi
Kernel log can be checked right in Hiveon OS ASIC. Click the pickaxe icon, and move to the Miner Log.
If this method doesn't work, try the command sh /www/pages/cgi-bin/get_kernel_log.cgi.
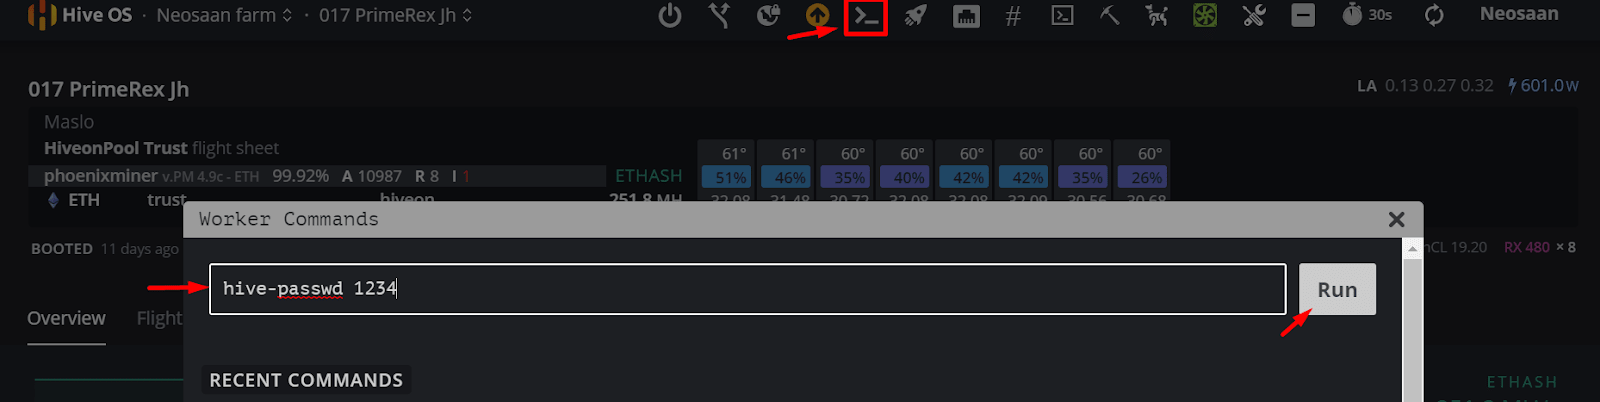
How to change the worker's password?
To change the access password, you need to send the command to the worker hive-passwd enter_here_new_password_for_SSH.
If you have the old version of Hiveon OS Client, send the following command to the worker:
echo "root:antMiner Configuration:$(echo -n "root:antMiner Configuration:$new_pw" | md5sum | cut -b -32)" > /config/lighttpd-htdigest.user
Instead of $new_pw specify the new password.
How to find out the ASIC's time zone?
Enter the command date. It will show the current time and date set on the ASIC.
How to remove Hive from T2T?
Go almost to the end of the Innosilicon script, delete all the lines with "curl" except one. There, you will execute the command. Replace the command systemctl start ....with systemctl disable ...This will disable Hive autostart. Scripts will remain, but will not interfere.
Monitoring
How to monitor profits?
You track your income on the page of the pool you have configured your ASIC for. You can usually do this on the home page by typing in the address specified in the settings (this may vary depending on the pool).
How to monitor the ASIC?
Go to your Hive account, create workers and copy the farmhash. Then, in the ASIC web interface, go to the Monitoring tab, then to Hive, and insert the farmhash.
How much traffic does the monitoring consume on Hive?
Monitoring alone consumes approximately 80-90 megabytes of traffic per month. Mining - 70-90 megabytes. In total, this means 150-180 megabytes per month from a single ASIC.
Technical questions
Why does ASIC need a lot of time to start during the first launch?
The first time the ASIC is run in Hiveon ASIC firmware, it is automatically tuned, with selection of optimal chip frequencies and voltages. This takes time, depending on the quality and degradation of the chips from 10 minutes to an hour.
Why does ASIC reboot or turn off during overclocking?
The standard power supply that comes with the ASIC is sometimes not designed for such power. Please provide your ASIC with a more powerful power supply or select a different overclocking profile (suitable in terms of power) from the list provided. To select the desired profile, go to the Miner configuration tab, then click on the Configuration of the auto tuner tab. There you can select the profile that best suits your needs.
The chips are also gradually warmed up to avoid damage from sudden heating. Reloading the miner software on the ASIC is a normal behavior during tuning during overclocking.
We do not recommend selecting the manual mode unless you are skilled enough to manually configure the ASIC.
What will happen if I don't select the overclocking profile?
If you do not select an overclocking profile at all, then the ASIC will run at stock voltages and frequencies that are specified in the eeprom by Bitmain. These are not optimal, and the chips work worse with them.
Why you need to select the profile:
-
It sets the optimal frequencies and voltages. The ASIC will be more stable with them. Stable operation is not guaranteed on the eeprom data.
-
Selecting a profile starts the tuning of the chips. This will fine-tune the chips in a short time, and further tuning of the red chips will be done infrequently (usually no more than 24 hours), with checks every 3 hours. But if you don’t start tuning initially, the chips will not be tuned, and the checks every 3 hours will take much longer until the chips are tuned. It could even take a few days. And if you work at suboptimal frequency and voltage ratios, more red chips will appear.
Why does it take a while for the miner to start running?
Due to the gradual warming of ASICs.
Why is the consumption in watts shown incorrectly?
To display the correct approximation of consumption, use any overclocking profile. The consumption will be displayed with an error of +3% to -10%.
I get unrealistic numbers on the fan speeds, for example, 30600 rpm and 509%.
This is caused by either a broken fan or sensor. Antminers often write 30600 if they have trouble getting stats from the sensors. Check the connectors again or replace the fans.
Why does Hiveon ASIC firmware show higher temperature than the stock one while having the same hashrate?
There are multiple PCB revisions on the S9 and T9 with different thermal sensor models. Standard Bitmain firmware works with one temperature sensor model. If the model is unknown, the Bitmain firmware takes the PCB temperature, adds 15 degrees to it and shows the result as the chip temperature. In reality, the temperature can be much higher. With Hiveon ASIC, the sensors are constantly checked, and if there is software on them, the actual temperature is checked. Bitmain firmware endangers ASIC by showing incorrectly low chip temperatures. If you see a difference between the PCB temperature and the chip temperature at 15 degrees, then the chip temperature is incorrect. Temperatures above 90 degrees are undesirable. 80-90 degrees is the optimal operating temperature. The temperature limit that Hiveon OS ASIC firmware alerts you when you exceed is 85 degrees by default. You can change this limit at your discretion by clicking on the thermometer icon.
Please note that by raising this limit, you do so at your own risk! Exceeding this temperature can affect the operation of the devices very negatively and lead to failure.
You can also use the command sed -i 's/min-fan-temp=80/min-fan-temp=XX/ /config/config.conf, where ХХ is your temperature. The main thing is to specify at least 70 degrees. Lower temperatures should be avoided.
What is the reason for the zero temperature of the chips and the reboot?
Most likely, the issue is a hardware failure of the ASIC. Perhaps a temperature sensor has failed or one of the boards has become unusable. Try disabling the malfunctioning board.
Why did ASIC's temperature rise to 90 degrees?
Clearly something is wrong with the board, or the thermal paste on the sensor chip has dried. There might also be a problem with the chip itself. Try cleaning the ASIC inside - in some cases this may help. Also, we suggest to lower the overlocking and improve room ventilation.
Why is the temperature of the chips 86 degrees, while the fans are not 100%?
This is normal up to 90 degrees - less noise and fan wear. Above 90 degrees, the fan speed increases.
What are HW and what number of them are okay?
If the chip responds with a delay from ideal values, then HW (Hardware Warnings) appear. This is an indicator of how difficult the ASIC is to overclock, or the extent to which it is worn out. There are many reasons why HW appear, ranging from incorrect overclocking parameters (low voltage, overclocking), technical problems (e.g. hashboard malfunction), and software errors. HW have no effect on the number of invalid shares.
HW do not occur only on perfectly new chips. There are several theories about their acceptable number. According to the basic one, if the number of HW does not exceed 100 per hour - everything is fine. If there are more of them, then it may be worth lowering the overclock. Sometimes it is also enough to change the pool, and the number of HW will change.
How does the ASIC consumption behave when there is no internet connection?
It restarts the miner and waits for the connection to appear again. Unlike the stock firmware, it does not waste electricity.
What is the minimum Internet speed requirement for the firmware?
Mere Kilobits are used by the ASIC, the speed is not a key requirement. Ping is more important: the lower the ping to the pool, the better.
S19 questions
Are the firmware for the Beagle Bone and Amlocig boards expected?
Yes, they are in the development stage.
Will there be support for other models of the 19 series?
Yes, they are in the development stage.
The Xilinx control board from ASIC 19 series broke. There are no such control boards for sale. Can it be replaced with another one?
Yes, you can install the control board from Antminer S17+/S17E/T17+/T17E (xilinx board and modification "+" or "E"). Then, select Hiveon firmware "xilinx 17" for 19 series.
Does the firmware flash ASIC like on previous models of antminers?
No, the firmware works as bootable. ASIC is loaded from the SD card, and if you get the card, it will boot on the factory firmware. Firmware updates also only affect files on the SD card. This will have a good effect on the warranty, but will require an always inserted SD card in each ASIC for the Hiveon firmware to work.
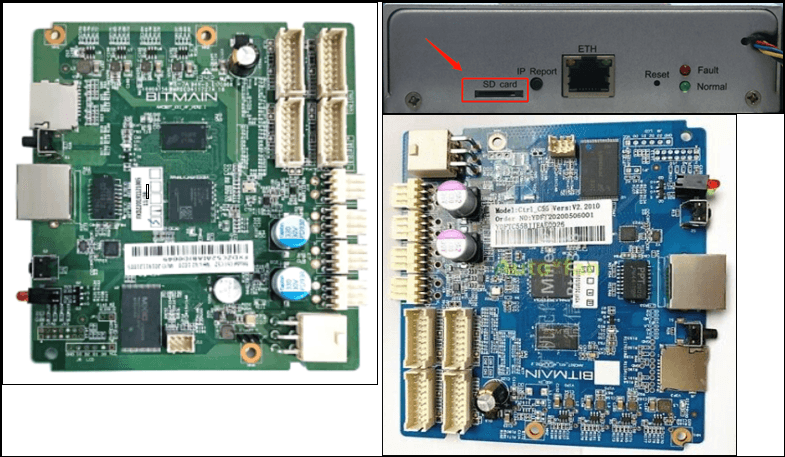
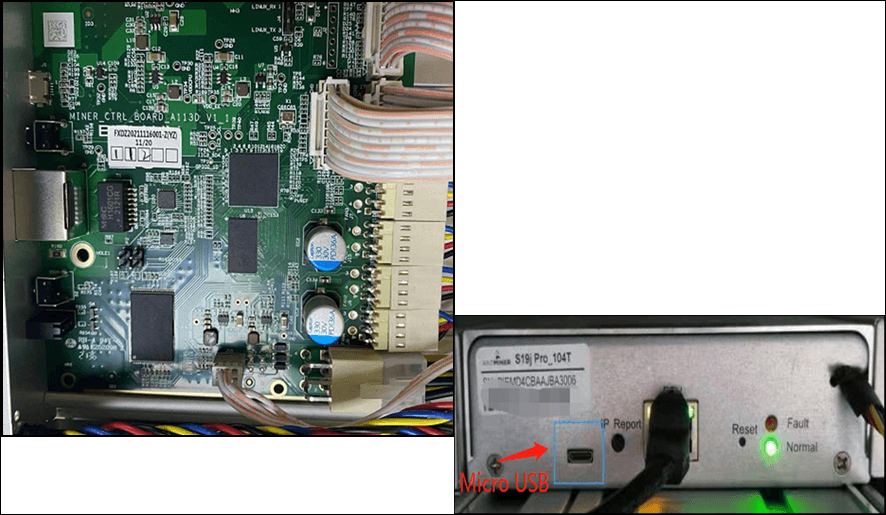
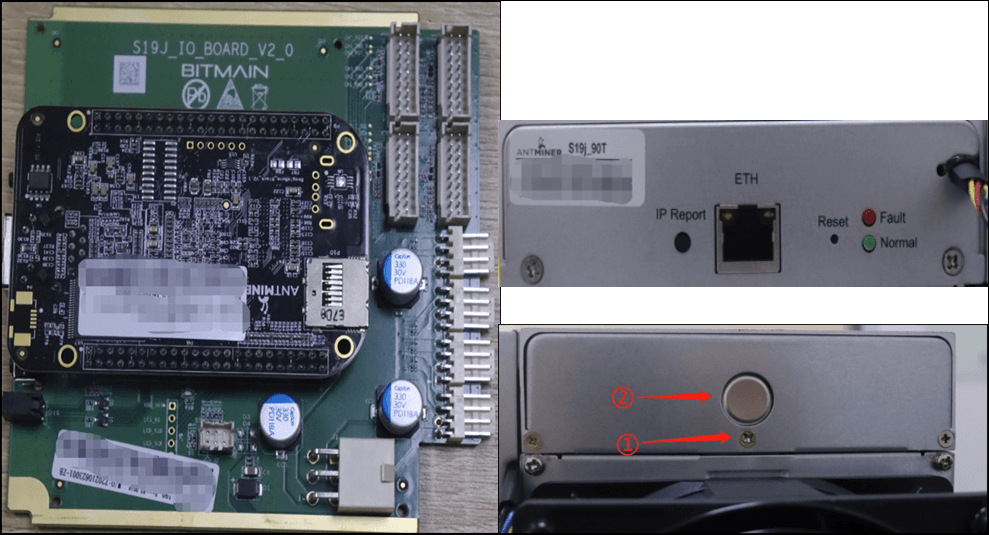
How to identify the type of a control board I use?
See the images below that represent an ASIC configuration peculiarities:
Xilinx 7007 with SD slot
Amlogic A113D with microUSB
Beagle Bone + IO board, SD card
S9 questions
How long, on average, does an S9 starts with auto-tuning on Hiveon ASIC?
The speed of auto-tuning depends on the condition of the chips. If the ASIC is new, it takes up to 10 minutes. If the chips are worn, it may take half an hour or more, until each chip selects a parameter.
How to set up static IP for S9 in the improved Hiveon ASIC firmware? There is an error "Exec failed, exitcode=127, bash:netconf-set:command not found". The Hiveon ASIC firmware version is 1.02; 0.1-13.
Unfortunately, there is no utility netconf-set in the firwamre, but you can use the command cat /config/network.conf ?.
The first command:
printf 'hostname=%s\nipaddress=%s\nnetmask=%s\ngateway=%s\ndnsservers="%s"\n' 'pir 47 nov' '192.168.1.40' '255.255.255.0' '192.168.1.1' '8.8.8.8' > /tmp/network.conf
The second command. It is essential to check if all the addresses are correct:
сat /tmp/network.conf
But these are not all the commands. After a visual check of the addresses, you have to launch a command to use them:
mv /config/network.conf /config/network.conf.old && mv /tmp/network.conf /config/network.conf && sync && echo 'ok' > /config/network_restart
Caution: the command irrevocably and without any checks will force the ASIC to work with the addresses that were specified in the first command. Just in case, it is advisable to have physical access to the ASIC in order to reset it.
How to disable Asic Boost in S9 firmware?
If you connect to the pool without Asic Boost support, this mode will not be enabled. However, we recommend using a pool that supports the ASIC Boost mode. This will reduce power consumption and increase speed.
S9 on Hiveon OS in the log every 30 minutes writes "fee pool error" and reboots the miner. Why?
Most likely, you have no access to slushpool on the firewall. Dev fee goes to slushpool. If there is no connection to it, the ASIC reboots.
How to "cure" viruses on S9/S10?
Try to complete the following steps:
- Write the image to the SD card, rearrange the jumper on the board and turn on the miner
- At first, 2 lamps blink simultaneously. You need to wait until the lamps start blinking sequentially
- Remove the card and bring the jumper back, restart the miner (via power)
The SD image is suitable for removing Antbuild on any Antminer S9 firmware. Since Antbuild burns the processor fuses, a simple firmware update after “cureing” will bring back the the two-lamp problem, and the miner will stop loading. To avoid this, you need to remove several files from the firmware.
Open the firmware file in 7-zip and remove the following files from the xilinx folder: BOOT.bin, devicetree.dtb and uImage. Save changes. After tihs operation, you can now update the miner with the modified firmware file without worrying about the two lamps issue. Any subsequent miner update will also require you to follow the above steps to modify the firmware.
The recovery image: https://download.hiveos.farm/asic/repo/fw/Antminer/recovery/antbuild_v1_recovery_s9.img
Please note that this image can only deal with Antbuild v1. Modern viruses, such as Antbuild v2, cannot be "cured" or removed. The problem can only be resolved by replacing the entire processor or control board.
