Adding a custom miner
Hiveon OS supports several popular miner algorithms, but not every single one. For this purpose we added a new feature called Custom Miner Integration that allows users to add a miner that’s not “baked” into the distribution image of the OS. You have the option to either install a pre-created package or create one yourself. But in this guide we’ll mostly cover the steps required to install a pre-created package.
Installing A Custom Miner
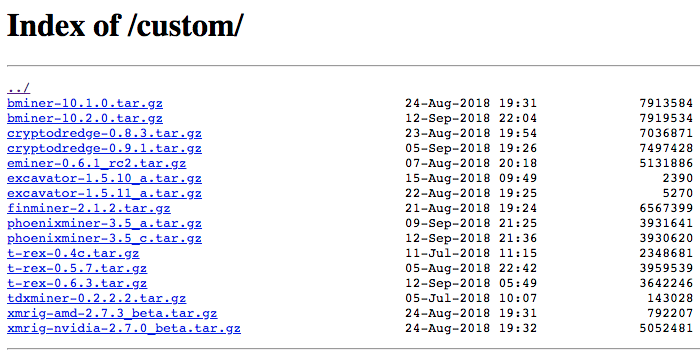
Start by going to the custom miner download page and simply copy the URL to the file.
Custom miner repository
To install a custom archive manually on the rig you can download it and unpack it to /hive/custom folder. Note that even though you did copy it locally you will still need the URL for the Flight Sheet to work.
Setting Up The Flight Sheet
We covered the process of creating a Flight Sheets and Wallets, which you will also require, in one of our previous articles, so we won’t go into the details, assuming you already know how to do it.
Got to the Flight Sheets tab in your farm’s Dashboard. In the Add New Flight Sheet section, start filling in the following fields:
- Flight Sheet Name — use a name that will describe the Flight Sheet’s purpose best. For example, ETH on nanopool using claymore; flypool zcash on dstm; etc.
- Coin — this works like a filter, you can see wallets, pools and miners only for the chosen coin. For example, if you choose ETH the filter will hide all your pre-created wallets and pools that don’t support or aren’t associated with that coin.
- Wallet — choose a wallet for this Flight Sheet. These are the wallets you created in the Wallets tab.
- Pool — select Configure in miner for the Custom miner option in the Miner field to show-up.
- Miner — select Custom and then click the Setup Miner Config for miner specific settings, then fill in the necessary fields. Note, each miner can have a different set of parameters and required fields.

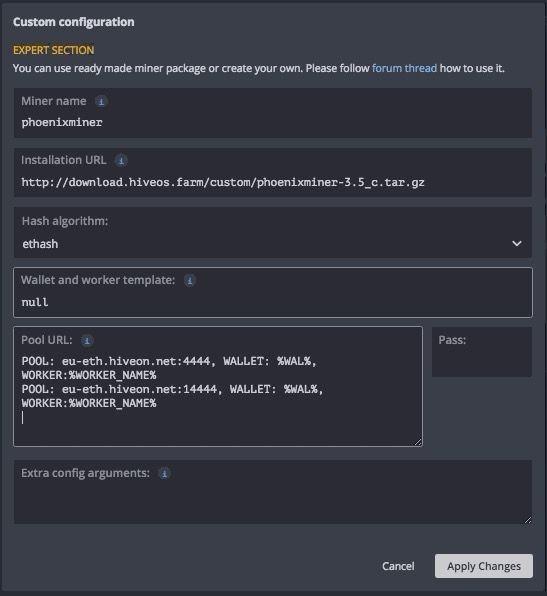
Because we’re setting up a Custom miner we need to manually configure these settings via the Setup Miner Config window. Click Setup Miner Config button in Miner and fill in the following fields:
- Miner name — use the same name as the package. For example: if the package name is
phoenixminer-3.5_c.tar.gz, then the miner name must bephoenixminer. - Installation URL — the direct URL to the miner package.
- Hash algorithm — choose the hash algorithm for the miner.
- Wallet and worker template — this will depend on your miner specific configuration
- Pool URL — the pool’s address and also the pool specific settings like passwords, wallets, and ports. Note, we recommend typing the values in the following format:
WALLET: %WAL%, WORKER:%WORKER_NAME%. Also all values should be separated by a comma. - Pass —
xa default setting, usually left as is. - Extra config arguments — these are miner specific and are optional. Note, these may be important in certain cases, so we recommend reading your miner’s documentation for additional details.
- Click Apply Changes and you’re all done
Once you’re done click the Create Flight Sheet button. You can now apply the Flight Sheet you’ve created.
Example: Adding and Setting-up Phoenix Miner
Now that we showed you how to set up a custom miner, let’s put it to practice by setting-up Phoenix Miner 3.5c on Hiveon Pool using the ethash miner algorithm as an example.
Custom miner Flight Sheet
In the Add New Flight Sheet section, start filling in the following fields:
- Coin — ETH
- Wallet — Example ETH wallet we created.
- Pool — select Configure in miner for the Custom miner option in the Miner field to show-up.
- Miner — select Custom and then click the Setup Miner Config for miner specific settingsб then fill in the necessary fields. Note, each miner can have a different set of parameters and required fields.
- Flight Sheet Name — Phoenix on Hiveon

Custom miner configuration
Now we need to configure the miner. Click Setup Miner Config button in Miner and fill in the following fields:
- Miner name — we’ll call it
phoenixminer - Installation URL — adding the URL of the package
https://download.hiveos.farm/custom/phoenixminer-3.5_c.tar.gz - Hash algorithm — select
ethashfrom the dropdown list - Wallet and worker template — type
null, as we’re using an ETH wallet we already have - Pool URL — we’ll be using Hiveon Pool address
POOL: eu-eth.hiveon.net:4444, WALLET: %WAL%, WORKER:%WORKER_NAME%
POOL: eu-eth.hiveon.net:14444, WALLET: %WAL%, WORKER:%WORKER_NAME%
- Pass — set to
x - Extra config arguments — in our case we leave this field blank.
- Click Apply Changes and you’re all done.

How to build your own package?
Hive 2.0 supports custom miners that you can “cook” yourself and you’ll need to implement using several easy scripts in order to get your miner to work and send stats to Hive. Please take existing integrations as a starting point.
The integration documentation is here. To install custom archive manually you can just unpack it to /hive/miners/custom.
To install it from URL run /hive/miners/custom/custom-get url-to-your-superminer. Use “-f” argument at the end to reinstall it: /hive/miners/custom/custom-get url-to-your-superminer -f. Since v0.6 for updating Custom miner, it is just enough to change URL in your Flight Sheet for the new one.