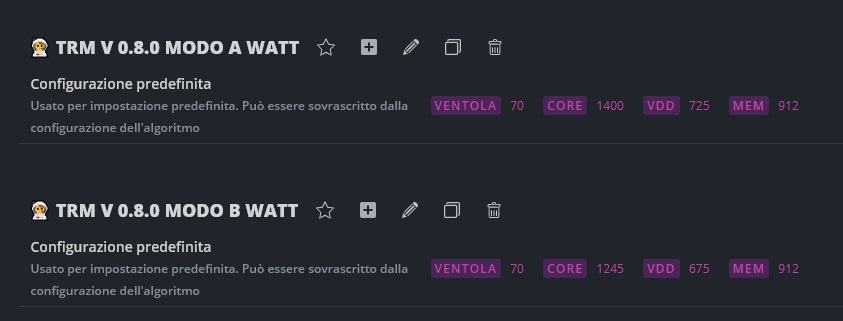
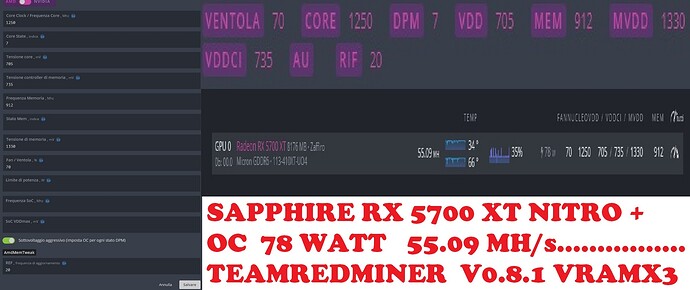
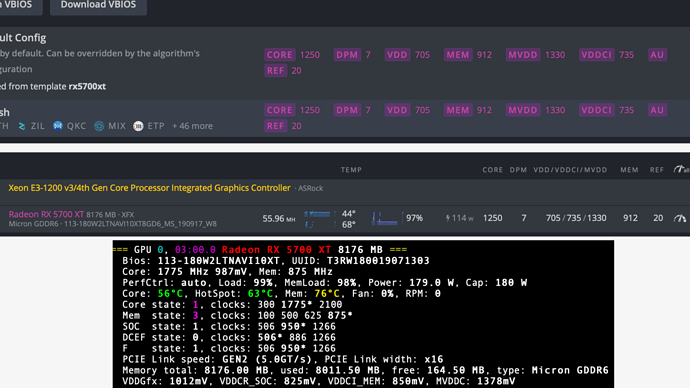
Good day everyone I opened this post to compare ourselves with the various experiments we have all done for the best setting of our AMD RX 5700 XT in my case Sapphire nitro + OC.
I wanted to consult with you because before moving on to hive.os I tried the whole migration guide from TeamRedMiner V 0.7.22 to the new v0.8.0 via windows I specify that I already have a bios mod flash of igorlab and up to the version of TRM V 0.7.22 no problem!
I followed the guide and modified the bios like this: reopen your (already edited once) bios. Open the trap timings
editor for the 1500/1550 MHz entry that you copied in the previous step by
clicking the “1550 MHz” button. You want to increase the DRAMTiming 12 (tREF)
entry to 2x the original value. Do the same thing to the higher frequency
entries, or copy / paste the 1550 MHz strap again after you’ve modified
it. Remember to do this for both mem types unless you know you have Micron or
Samsung. You can get even higher hashrates by using 3x the original tREF
value, but we suggest 2x as a first test. Save the bios, flash to the
gpu. Reboot.
But in the moment of the flash bios on windows it gave me error!
And I gave up before I could do any damage.
Now I ask everyone in the forum if anyone managed to make this new bios for Sapphire rx 5700 xt nitro + OC with the modification of DRAMTiming 12 (tREF) and if they managed to put the bios on the GPU and if they had any results?
I tried as written in the guide overclocking with this bios that I already have from igorlab but the gpu is not stable and goes into crack and always reboots the system.
CAN SOMEONE GIVE ME SOME MORE INFORMATION?
GPUs supported and tested:
Navi10 (5700XT/5700/5600XT)
TRM v0.8.0 both contains a range of optimizations for the standard A-mode kernel
as well as a new default mining mode for Navi10, the B-mode. Compared to
previous versions the A-mode has reduced power draw and often a slight hashrate
improvement as well. A first version of this improved kernel was released in
v0.7.22. It has since been modified in v0.8.0 to be more similar to < 0.7.22
versions while still preserving the power draw improvements and hashrate
increase.
Navi10 A/B-mode
The B-mode is the biggest news for Navi10 in the v0.8.0 release, at least for
5700XT/5700. It has been deemed stable enough in tests to become the new default
mining mode for 5700XT/5700. You must have a driver that allows large
allocations, otherwise the miner will downgrade to A-mode. The A-mode is a
standard ethash mining mode, similar to other miners.
The B-mode runs at a much lower balance between core clk vs mem clk, meaning for
5700XT/5700s you can typically drop core clk -100 MHz and core voltage -50mV
while still preserving even a high hashrate such as 55-56 MH/s, only losing
-0.02-0.05 MH/s while saving 5-6W, sometimes even more. On 5600XT, there
isn’t enough vram available with the 6GB to produce the large effect seen on the
bigger 5700XT/5700s, although the effect is still there.
Given the above, TRM chooses B-mode as default for 5700XT/5700s since it’s
straightforward to realize the benefits for these larger gpus. For 5600XTs,
TRM chooses the standard A-mode by default. Advanced tuners should be able to
manually use the B-mode on 5600XTs with --eth_config=B, then carefully clocking
down their core clock step by step, finally lowering voltage 6.25-12.5mV or
so. This will save power, but the effect is smaller than for 5700s.
The mode intensity range for Navis is 16 * NrCUs:
5700XT: 0-640
5700/5600XT: 0-576
Any higher specified number than this will be lowered to the max possible value.
5700/5700XT Stock-to-Performance Guide
Most 5700/5700XTs can be flashed easily. Igor’s lab has created a range of tools
for advanced Navi tweaking. This is a guide for taking a stock Navi 5700/5700XT
to a setup that produces 56 MH/s in the new TRM B-mode. Note that not all gpus
can handle the high hashrate and will crash repeatedly. Such gpus need to be
clocked down and run at a less aggressive hashrate.
For using the guide below, we highly recommend making sure you can run the TRM
B-mode by using a driver that supports large single allocations (amdgpu-pro >=
20.30 on linux, Adrenalin >= 20.9.1 on windows).
NOTE: flashing a bios always presents an added risk. The guide here is presented
as-is using known standard tools that have been used on many rigs
worldwide, and even the few times when a bios flash goes wrong you can
most often recover by reflashing the original bios in recovery mode / safe
mode.
-
Set up a tool to control clocks and voltages. You can use the AMD driver
tools, MSI Afterburner or OverdriveNTool on Windows. On linux you need to
read up on and understand how the sysfs api works for amdgpu-pro, or use a
mining distro that helps you setting clocks. -
Start with a safe configuration of 1275 MHz core, 875 MHz mem (1750 MHz for
drivers displaying 2x mem clock), set 850mV for voltage. Start the miner and
verify that mining works fine. -
Google “Igor’s lab red bios editor”. Read the tutorial they provide and
download and install the software. -
Save the bios from your gpu to disk using atiflash or amdvbflash (and keep it
to be able to flash back if necessary). -
Open the saved bios in RedBiosEditor, copying the saved bios from linux to a
win workstation if necessary. There are often two memory types available in
the bios, Samsung and Micron. If you’re not 100% sure which type you have, do
the copy-up described below for both. -
Bios mod 1: strap copy-up. We want to copy the strap (the long string of
letters and digits) for 1500 or 1550 MHz to the higher frequency
entries. Copy it and paste it for all higher entries above the strap you
copied. Save the bios and flash to the gpu. Reboot and test mining again. You
should now hit approx 53 MH/s. -
Bios mod 2: reopen your (already edited once) bios. Open the trap timings
editor for the 1500/1550 MHz entry that you copied in the previous step by
clicking the “1550 MHz” button. You want to increase the DRAMTiming 12 (tREF)
entry to 2x the original value. Do the same thing to the higher frequency
entries, or copy/paste the 1550 MHz strap again after you’ve modified
it. Remember to do this for both mem types unless you know you have Micron or
Samsung. You can get even higher hashrates by using 3x the original tREF
value, but we suggest 2x as a first test. Save the bios, flash to the
gpu. Reboot. -
When running the miner again, you should hopefully see a higher hashrate yet
again. if you have a driver that supports large allocations and TRM defaults
to B-mode, a core clock of 1250 MHz and mem clock at 912 MHz should now
produce a 55.5-56.0 MH/s hashrate. If you’re in A-mode, you need a core clk
around 1350-1400 MHz to support such high hashrates. -
Now, retune your gpu to the configuration of your choice. Start by tuning the
mem clk to a level where your gpu seems to run stable and produces the
hashrate you’re looking for. Less can definitely be more if you’re looking
for efficiency. Next, tune down the core clk as much as possible, restarting
the miner to check if you’ve lost hashrate or not. We want to find the
balance between core clk and mem clk so that neither of them is the clear
bottleneck. In B-mode, you usually see a sharp drop in hashrate when the core
clk is dropped -25 MHz too low. In A-mode, you will also see the hashrate
dropping but not as dramatic.Last, lower the voltage step by step as much as possible. Gpus with good
cooling can often drop as low as 700-725mV. For dropping below 700mV, the
powerplay table limits need to be modified. This is not covered by this
quickstart guide.Note: Micron memory is in general easier to tune for these high
hashrates. Samsung GDDR6 is often harder to run stable, and often needs to be
clocked down to target e.g. 54-55 MH/s or lower.


