More
referral
Increase your income with Hive. Invite your friends and earn real cryptocurrency!

Hive Shell

:uk: Hive Shell - ultimate tool for remote access to your workers

%D0%B8%D0%B7%D0%BE%D0%B1%D1%80%D0%B0%D0%B6%D0%B5%D0%BD%D0%B8%D0%B5

About Hive Shell

Almost a year ago Hive OS introduced the function of remote access to workers via Teleconsole. This service immediately became very popular among our users for solving various remote maintenance tasks.
Unfortunately, it has become very difficult to use this service lately because of instability in the service’s work, so the Hive team has begun to look for an alternative solution, which we are very pleased to present to you.

Introducing Hive Shell.
Hive Shell - provides remote access to your workers using the Hive OS network infrastructure, and also has its own unique features such as access via an SSH client and console sharing.

Let’s take a closer look at Hive Shell.

How to use Hive Shell

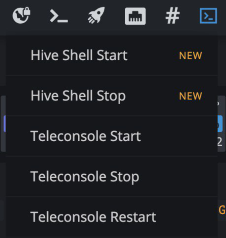
In the web interface in the “Remote Access” menu %D0%B8%D0%B7%D0%BE%D0%B1%D1%80%D0%B0%D0%B6%D0%B5%D0%BD%D0%B8%D0%B5 there are two items “Hive Shell Start” and “Hive Shell Stop”.

%D0%B8%D0%B7%D0%BE%D0%B1%D1%80%D0%B0%D0%B6%D0%B5%D0%BD%D0%B8%D0%B5

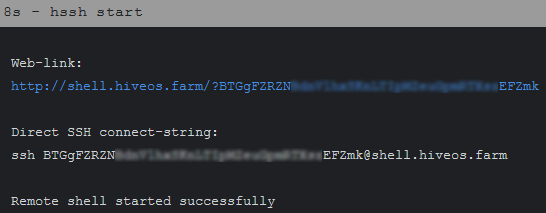
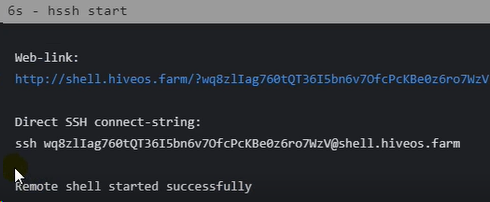
After starting the service through the menu item “Hive Shell Start” you will see the result of the command %D0%B8%D0%B7%D0%BE%D0%B1%D1%80%D0%B0%D0%B6%D0%B5%D0%BD%D0%B8%D0%B5
The result of this command is a clickable link %D0%B8%D0%B7%D0%BE%D0%B1%D1%80%D0%B0%D0%B6%D0%B5%D0%BD%D0%B8%D0%B5 , clicking on which in the browser tab will open the terminal of the worker.
You can also open the result of the command execution to take advantage of additional command features such as sending a web link to a technician or connecting using an SSH client (which will be discussed separately).
%D0%B8%D0%B7%D0%BE%D0%B1%D1%80%D0%B0%D0%B6%D0%B5%D0%BD%D0%B8%D0%B5

Attention! Send the access link to your worker only to a person you trust.

So it works
com-gif-maker

Run from console

Hive Shell can be launched both from the web interface and from the console. From the Hive Shell console, start the hssh command (valid parameters start | stop | restart).

Start service

hssh start

Stop service

hssh stop

Restart service

hssh restart

Console sharing

A very important feature of Hive Shell is the ability to share the console. You can watch (or even take part) the actions that are performed by the person with whom you have shared access to the worker through Hive Shell.
Using this function is extremely simple - just open the same link that was shared with another person.
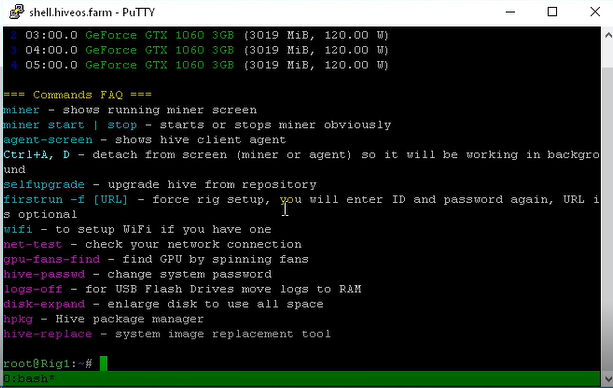
This is how it looks (on the left - Hive Shell is launched in the FireFox browser, on the right - via the PuTTY client):


All actions performed in one console are also displayed in the other.

Using SSH client

With Hive Shell, you can connect to your worker using an SSH client such as PuTTY.

Private key generation

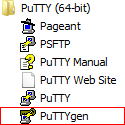
To do this, you need to perform a one-time procedure - generate your private keys which can be done by using the program that is part of the PuTTY package - PuTTYgen (PuTTY Key Generator)
%D0%B8%D0%B7%D0%BE%D0%B1%D1%80%D0%B0%D0%B6%D0%B5%D0%BD%D0%B8%D0%B5

Start PuTTYgen and click the “Generate” button, randomly move the mouse cursor over the application field until the progress bar reaches the end.

Then click the “Save private key” button, you can ignore the warning about saving without a password by clicking “Yes” and save the key on your computer.

Configure SSH Client

Next, you need to configure your SSH client using the generated private key.
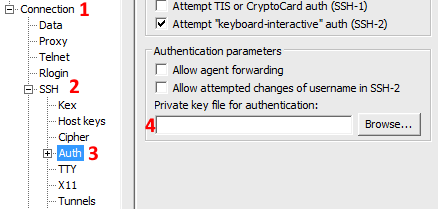
Run PuTTY, open the Connection section on the left and the SSH subsection in it and get Auth, on the right there will be a file selection menu where we need to select the private key saved in the previous step.
%D0%B8%D0%B7%D0%BE%D0%B1%D1%80%D0%B0%D0%B6%D0%B5%D0%BD%D0%B8%D0%B5
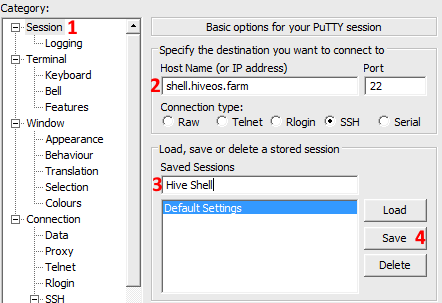
After that go to the Session section and save our profile. To do this, set the Host Name - shell.hiveos.farm and the name of the profile, for example - Hive Shell and press the" Save "button to save.
%D0%B8%D0%B7%D0%BE%D0%B1%D1%80%D0%B0%D0%B6%D0%B5%D0%BD%D0%B8%D0%B5

In short, it looks like this:

Launch PuTTY

The next step is very simple.

  • start Hive Shell and wait for a successful start %D0%B8%D0%B7%D0%BE%D0%B1%D1%80%D0%B0%D0%B6%D0%B5%D0%BD%D0%B8%D0%B5
  • open the result of the command
    %D0%B8%D0%B7%D0%BE%D0%B1%D1%80%D0%B0%D0%B6%D0%B5%D0%BD%D0%B8%D0%B5
  • copy session name Hive Shell
    %D0%B8%D0%B7%D0%BE%D0%B1%D1%80%D0%B0%D0%B6%D0%B5%D0%BD%D0%B8%D0%B5
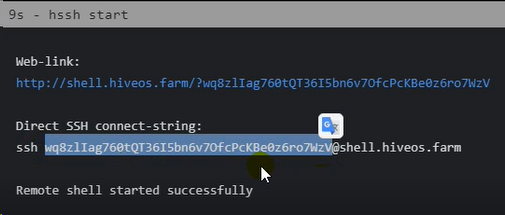
  • launch PuTTY, open the previously saved Hive Shell profile and, using the right mouse button, insert the saved session name as the user name
    %D0%B8%D0%B7%D0%BE%D0%B1%D1%80%D0%B0%D0%B6%D0%B5%D0%BD%D0%B8%D0%B5 and hit Enter
  • that’s it! Pretty simple, isn’t it?

%D0%B8%D0%B7%D0%BE%D0%B1%D1%80%D0%B0%D0%B6%D0%B5%D0%BD%D0%B8%D0%B5

3 Likes

:ru: Hive Shell - средство удаленного доступа к вашим воркерам

%D0%B8%D0%B7%D0%BE%D0%B1%D1%80%D0%B0%D0%B6%D0%B5%D0%BD%D0%B8%D0%B5

О Hive Shell

Почти год назад в Hive OS появилась функция удаленного доступа к воркерам посредством сервиса Teleconsole. Данный сервис сразу стал очень популярен среди наших пользователей для решения различных задач по удаленному обслуживанию.
К большому сожалению последнее время воспользоваться этим сервисом стало очень сложно ввиду нестабильности в работе сервиса, поэтому команда Hive приступила к поиску альтернативного решения, которое теперь мы с большим удовольствием представляем Вам.
И так встречайте - Hive Shell.
Hive Shell - предоставляет удаленный доступ к Вашим воркерам, используя сетевую инфраструктуру Hive OS, а также обладает своими уникальными особенностями такими как доступ через SSH клиент и совместное использование консоли.

Давайте познакомимся с Hive Shell поближе.

Как этим пользоваться

В веб интерфейсе в меню “Удаленный доступ” %D0%B8%D0%B7%D0%BE%D0%B1%D1%80%D0%B0%D0%B6%D0%B5%D0%BD%D0%B8%D0%B5 появилось два пункта “Hive Shell Start” и “Hive Shell Stop”

%D0%B8%D0%B7%D0%BE%D0%B1%D1%80%D0%B0%D0%B6%D0%B5%D0%BD%D0%B8%D0%B5

После запуска сервиса через пункт меню “Hive Shell Start” вы увидите результат выполнения команды %D0%B8%D0%B7%D0%BE%D0%B1%D1%80%D0%B0%D0%B6%D0%B5%D0%BD%D0%B8%D0%B5
Результат данной команды представляет собой кликабельную ссылку %D0%B8%D0%B7%D0%BE%D0%B1%D1%80%D0%B0%D0%B6%D0%B5%D0%BD%D0%B8%D0%B5 , нажав на которую в вкладке браузера откроется окно терминала воркера.
Также можно открыть результат выполнения команды, чтобы воспользоваться дополнительными возможностями команды такими как передача веб ссылки техническому специалисту или подключение, используя SSH клиент (будет рассмотрено отдельно).
%D0%B8%D0%B7%D0%BE%D0%B1%D1%80%D0%B0%D0%B6%D0%B5%D0%BD%D0%B8%D0%B5

Внимание! Передавайте ссылку для доступа к Вашему воркеру только лицу, которому Вы доверяете.

Так это работает
com-gif-maker

Запуск из консоли

Hive Shell может быть запущен как из веб интерфейса так и из консоли. Из консоли Hive Shell запускается командой hssh (допустимые параметры start | stop | restart )

Запуск сервиса

hssh start

Останов сервиса

hssh stop

Перезапуск сервиса

hssh restart

Совместное использование консоли

Очень важной особеннойстью Hive Shell является возможность совместного использования консоли. Вы можете наблюдать (или даже принимать участие) за теми действиями которые осуществляются человеком с которым вы поделились доступом к воркеру посредством Hive Shell.
Использование данного функциона предельно простое - просто откройте туже ссылку, которой поделились с другим человеком.
Так это выглядит (слева - Hive Shell запущен в браузере FireFox, справа - через клиент PuTTY):


Все действия в одной консоли отображаются в другой.

Использование SSH клиента

С помощью Hive Shell вы можете можете подсоединиться к вашему воркеру, используя SSH клиент такой как PuTTY.

Генерация приватного ключа

Для этого Вам необходимо провести разовую процедуру - сгенерировать ваши приватные ключи.
Для этого необходимо воспользоваться программой, входящей в состав пакета PuTTY - PuTTYgen (PuTTY Key Generator)
%D0%B8%D0%B7%D0%BE%D0%B1%D1%80%D0%B0%D0%B6%D0%B5%D0%BD%D0%B8%D0%B5

Запустите PuTTYgen и нажмите кнопку “Generate”, хаотически водите курсор мыши по полю приложения пока прогресс-бар не дойдет до конца.

После чего нажмите кнопку “Save private key”, предупреждение о сохранении без пароля можно проигнорировать, нажав “Да” и сохраните ключ на Вашем компьютере.

Настройка SSH-клиента

Далее Вам необходимо настроить Ваш SSH-клиент, используя сгенерированный приватный ключ.
Запускаем PuTTY, раскрываем слева секцию Connection и в ней подсекцию SSH и становимся на Auth, справа будет меню выбора файла, где нам нужно выбрать сохраненный на предыдущем этапе приватный ключ.
%D0%B8%D0%B7%D0%BE%D0%B1%D1%80%D0%B0%D0%B6%D0%B5%D0%BD%D0%B8%D0%B5
После этого переходим в секцию Session и сохраняем наш профиль. Для этого задаем Host Name - shell.hiveos.farm и имя профиля, например - Hive Shell и нажимаем кнопку “Save” для сохранения.
%D0%B8%D0%B7%D0%BE%D0%B1%D1%80%D0%B0%D0%B6%D0%B5%D0%BD%D0%B8%D0%B5

Кратко это выглядит так:

Запуск PuTTY

Далее процедура предельно проста

  • стартуем Hive Shell и дожидаемся успешного старта %D0%B8%D0%B7%D0%BE%D0%B1%D1%80%D0%B0%D0%B6%D0%B5%D0%BD%D0%B8%D0%B5
  • открываем результат выполнения команды
    %D0%B8%D0%B7%D0%BE%D0%B1%D1%80%D0%B0%D0%B6%D0%B5%D0%BD%D0%B8%D0%B5
  • копируем имя сессии Hive Shell
    %D0%B8%D0%B7%D0%BE%D0%B1%D1%80%D0%B0%D0%B6%D0%B5%D0%BD%D0%B8%D0%B5
  • запускаем PuTTY, открываем ранее сохраненный профиль Hive Shell и по правой кнопке мышки будет вставлено сохраненное имя сессии в качестве имени пользователя
    %D0%B8%D0%B7%D0%BE%D0%B1%D1%80%D0%B0%D0%B6%D0%B5%D0%BD%D0%B8%D0%B5 и жмем Enter
  • все мы на месте! Действительно просто, не правда ли?

%D0%B8%D0%B7%D0%BE%D0%B1%D1%80%D0%B0%D0%B6%D0%B5%D0%BD%D0%B8%D0%B5

Другие материалы

Знакомство с Hive Shell c YouTube канала “Доброго кота”

4 Likes

:uk: : FAQ

  1. Minimal requirements - Hive OS Linux client v0.6-11

:ru: ЧаВо

  1. Минимальные требования - Hive OS Linux клиент v0.6-11

It does now work, every time i am getting command not found.
Am i missing something?

You need at least Hive OS Linux client v0.6-11

But this useful info and can be added to article.

Got it! I upgrade and it worked! Thanks and great job Hive team.

This works for me. I’m using web browser, when I type “miner” it works too but no colors? How do I view miner with colors? I have no problem using Teleconsole and Shell in a box, miner have colors in them

Hi,

I’m looking for a way to increase the session time. I tried to upaded sshd config:

ClientAliveInterval 120
ClientAliveCountMax 720

But it doesn’t work, I’m still disconnected after 30 minutes of inactivity. Do you have any idea on how to configure hssh ?